上一节通过HTTP的GET操作,我们获取了天气相关的信息。但相关信息是以JSON格式发下来的,所以需要对数据进行解析。解析之前先明确几点:
1、JSON是一种数据格式,不是通信协议。有专门的解析函数,但如果懒得用,可以用特定的方法获取想要的数据。
2、解析数据的前提是了解数据的结构,而不是说对一组结构陌生的数据进行解析。
以上一节得到的数据为例:
{“results”:[{“location”:{“id”:”WX4BZD6KEJFY”,”name”:”Langfang”,”country”:”CN”,”path”:”Langfang,Langfang,Hebei,China”,”timezone”:”Asia/Shanghai”,”timezone_offset”:”+08:00″},”now”:{“text”:”Overcast”,”code”:”9″,”temperature”:”20″},”last_update”:”2019-09-19T20:15:00+08:00″}]}
这样看有点乱,整理一下:
{
"results": [{
"location": {
"id": "WX4BZD6KEJFY",
"name": "Langfang",
"country": "CN",
"path": "Langfang,Langfang,Hebei,China",
"timezone": "Asia/Shanghai",
"timezone_offset": "+08:00"
},
"now": {
"text": "Overcast",
"code": "9",
"temperature": "20"
},
"last_update": "2019-09-19T20:15:00+08:00"
}]
}
这样是不是整齐多了?
你会发现,这组数据貌似有个名字:results,它由三部分组成:location,now和last_update。也就是位置、当前天气和最后更新时间。剩下就是一些标点,可以最后考虑。
以“”id”: “WX4BZD6KEJFY””为例,前面的是“键”,后面的是“值”,合在一起,叫键值对。
可以看到,温度是27度。但程序没有眼睛,不能直接看,怎么办呢?偷懒的方式:从第一个符号“{”出现,计算数字“27”出现的位置,只要你的API链接不变,网站提供的数据格式不更新,一般来说也能行。
但这个方法有点low,所以,还是用JSON函数解析吧。
首先说一下,官方的SDK里面(例程IoT_Demo)提供了JSON相关的库,可以直接使用,所以这里的讲解主要参照官方,顺便百度了一下。
代码不少,但重复的比较多,所以理解起来不是很难。大致分6步:
1、添加头文件和相关源文件
这个简单,主要是user_json.c和user_json.h,放到指定位置。不会的,看我工程文件。
2、更新JSON数据
第二步就能获取数据了?
其实不是,因为数据的解析是一个整体的操作,这只是其中的一个环节。先看一下SDK中的例程文件user_webserver.c:
LOCAL int ICACHE_FLASH_ATTR
light_status_get(struct jsontree_context *js_ctx)
{
    const char *path = jsontree_path_name(js_ctx, js_ctx->depth - 1);

    if (os_strncmp(path, "red", 3) == 0) {
        jsontree_write_int(js_ctx, user_light_get_duty(LIGHT_RED));
    } else if (os_strncmp(path, "green", 5) == 0) {
        jsontree_write_int(js_ctx, user_light_get_duty(LIGHT_GREEN));
    } else if (os_strncmp(path, "blue", 4) == 0) {
        jsontree_write_int(js_ctx, user_light_get_duty(LIGHT_BLUE));
    }
..........
    return 0;
}
因为篇幅原因,去掉了一些代码。从函数名字可以看出来,它有一个关键词“get”,也就是“获取”。所以,这个函数的功能是把解析好的数据更新到JSON结构里。
明白了函数的功能,先定义一个“location”的更新函数,代码如下:
int ICACHE_FLASH_ATTR
json_location_get(struct jsontree_context *js_ctx)
{
    const char *path = jsontree_path_name(js_ctx, js_ctx->depth - 1);
    if (os_strncmp(path, "id", os_strlen("id")) == 0) {
     jsontree_write_string(js_ctx, "WX4BZD6KEJFY");
    }
    else if (os_strncmp(path, "name", os_strlen("name")) == 0) {
     jsontree_write_string(js_ctx, "Langfang");
    }
    else if (os_strncmp(path, "country", os_strlen("country")) == 0) {
     jsontree_write_string(js_ctx, "CN");
    }
    else if (os_strncmp(path, "path", os_strlen("path")) == 0) {
     jsontree_write_string(js_ctx, "Langfang,Langfang,Hebei,China");
    }
    else if (os_strncmp(path, "timezone", os_strlen("timezone")) == 0) {
         jsontree_write_string(js_ctx, "Asia/Shanghai");
    }
    else if (os_strncmp(path, "timezone_offset", os_strlen("timezone_offset")) == 0) {
         jsontree_write_string(js_ctx, "+08:00");
    }
    return 0;
}
同样的结构,同样的代码,就是把信息换一下。对比上下两个函数中的两行代码:
jsontree_write_int(js_ctx, user_light_get_duty(LIGHT_RED));

jsontree_write_string(js_ctx, "WX4BZD6KEJFY");
第一行,因为要写入整形数据,所以使用函数“jsontree_write_int”。
第二行,因为要写入字符串,所以使用函数“jsontree_write_string”。
还有一点注意事项,第二行写入的数据是死的,即便后面更新了数据,新的数据也进不来。这里写成这样的方式是为了演示,理解方便。
同样的方式,创建now和last_update这两个类型。
3、创建解析函数
参照SDK中的例程文件user_webserver.c(篇幅原因,去掉一些代码):
LOCAL int ICACHE_FLASH_ATTR
light_status_set(struct jsontree_context *js_ctx, struct jsonparse_state *parser)
{
    while ((type = jsonparse_next(parser)) != 0) {
        if (type == JSON_TYPE_PAIR_NAME) {
            if (jsonparse_strcmp_value(parser, "red") == 0) {
                uint32 status;
                jsonparse_next(parser);
                jsonparse_next(parser);
                status = jsonparse_get_value_as_int(parser);
                r=status;
                os_printf("R: %d \n",status);
            } else if (jsonparse_strcmp_value(parser, "green") == 0) {
                uint32 status;
                jsonparse_next(parser);
                jsonparse_next(parser);
                status = jsonparse_get_value_as_int(parser);
                g=status;
                os_printf("G: %d \n",status);
            }
...................
        }
    }
    return 0;
}
第2步的函数更新数据,那么数据从哪来?就是这里函数提供的。
程序中会分别判断red对应的值和green对应的值。如果有需要,可以进行相应的操作。不难理解吧?修改一下,换成我们需要的函数(篇幅有限,依然省略部分):
int ICACHE_FLASH_ATTR
json_location_parse(struct jsontree_context *js_ctx, struct jsonparse_state *parser)
{
int type;
char buffer[64];

while ((type = jsonparse_next(parser)) != 0){
if (type == JSON_TYPE_PAIR_NAME){
if (jsonparse_strcmp_value(parser, "id") == 0){
jsonparse_next(parser);
jsonparse_next(parser);
jsonparse_copy_value(parser, buffer, sizeof(buffer));
os_printf("id is = %s\r\n", buffer);
}
else if(jsonparse_strcmp_value(parser, "name") == 0){
jsonparse_next(parser);
jsonparse_next(parser);
jsonparse_copy_value(parser, buffer, sizeof(buffer));
os_printf("name is = %s\r\n", buffer);
}
else if(jsonparse_strcmp_value(parser, "country") == 0){
jsonparse_next(parser);
jsonparse_next(parser);
jsonparse_copy_value(parser, buffer, sizeof(buffer));
os_printf("country is = %s\r\n", buffer);
}
.............................
}
}
return 0;
}
因为咱们获取的是字符串信息,所以这里使用了函数“jsonparse_copy_value”。同理,创建now和last_updata的解析函数。
4、注册更新JSON数据和解析JSON数据的回调函数
参照SDK中的例程文件user_webserver.c中的代码,第394行:
LOCAL struct jsontree_callback light_callback =

JSONTREE_CALLBACK(light_status_get, light_status_set);
light_status_get是生成,light_status_set是解析。回调函数以结构体的形式注册,light_callback是结构体的名字。
所以,参照这个格式往里套,location的代码如下:
LOCAL struct jsontree_callback json_location_Callback =

JSONTREE_CALLBACK(json_location_get, json_location_parse);
now和last_updata同理:
LOCAL struct jsontree_callback json_now_Callback =
JSONTREE_CALLBACK(json_now_get,json_now_parse);
LOCAL struct jsontree_callback json_last_update_Callback =
JSONTREE_CALLBACK(json_last_update_get, json_last_update_parse);
5、生成一个JSON数的对象
参照SDK中的例程文件user_webserver.c中的代码,第397行:
JSONTREE_OBJECT(rgb_tree,
                JSONTREE_PAIR("red", &light_callback),
                JSONTREE_PAIR("green", &light_callback),
                JSONTREE_PAIR("blue", &light_callback),
                JSONTREE_PAIR("cwhite", &light_callback),
                JSONTREE_PAIR("wwhite", &light_callback),
                );
所以,先生成一个location的对象:
JSONTREE_OBJECT(location,
                JSONTREE_PAIR("id", &json_location_Callback),
                JSONTREE_PAIR("name", &json_location_Callback),
                JSONTREE_PAIR("country", &json_location_Callback),
                JSONTREE_PAIR("path", &json_location_Callback),
                JSONTREE_PAIR("timezone", &json_location_Callback),
                JSONTREE_PAIR("timezone_offset", &json_location_Callback)
);
然后,依次生成now和last_updata这两个对象。
现在分别生成了location、now和last_updata这三个结构,要把这三个结构组合起来:
JSONTREE_OBJECT(resultsArray,
JSONTREE_PAIR("location",&location),
JSONTREE_PAIR("now", &now),
JSONTREE_PAIR("last_update", &json_last_update_Callback)
);
得到的是这样一个结构:
{
"location": {
"id": "WX4BZD6KEJFY",
"name": "Langfang",
"country": "CN",
"path": "Langfang,Langfang,Hebei,China",
"timezone": "Asia/Shanghai",
"timezone_offset": "+08:00"
},
"now": {
"text": "Overcast",
"code": "9",
"temperature": "20"
},
"last_update": "2019-09-19T20:15:00+08:00"
}
然后,加上方括号:
JSONTREE_ARRAY(jsonArray,JSONTREE_PAIR_ARRAY(&resultsArray));再然后,生成名为“results”的对象:
JSONTREE_OBJECT(object,

JSONTREE_PAIR("results", &jsonArray),

);
至此,一个完整的数据结构已经创建好了,跟天气网站发给我们的结构是一样的。
再再然后,我们需要把这个结构放进一个对象里,方便调用:
JSONTREE_OBJECT(temp,

JSONTREE_PAIR("object", &object),

);
6、解析天气数据
参照SDK中的例程文件user_webserver.c中的代码,第1606行:
jsontree_setup(&js, (struct jsontree_value *)&wifi_req_tree, json_putchar);

json_parse(&js, pParseBuffer);
改为我们的代码:
struct jsontree_context js;

jsontree_setup(&js, (struct jsontree_value *)&object, json_putchar);

json_parse(&js,c);
函数“jsontree_setup”生成格式数据树,函数“json_parse”对数据进行解析,并打印出来。其中,“c”是指针,指向从“{”开始的JSON数据。具体可以看我工程里的代码,这里就不再贴出来了。
程序修改完成,保存、清理、编译、下载一条龙,然后重新上电。这里借助串口助手来查看效果。效果如下所示:
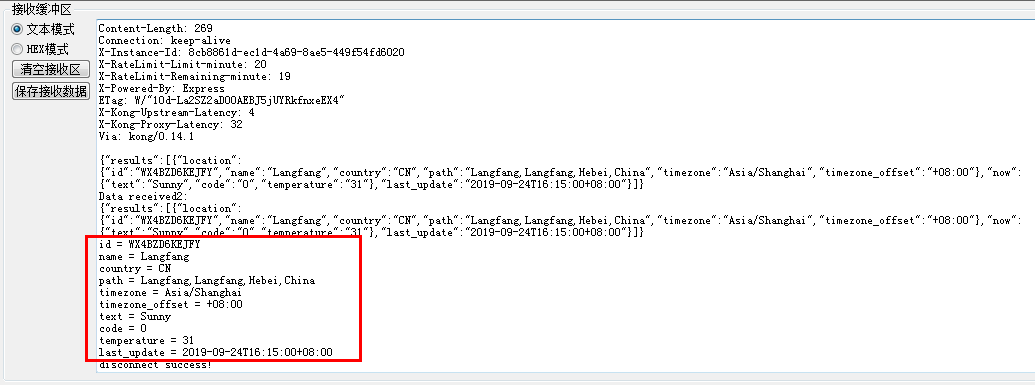
从截图上可以看到,程序通过解析函数,已经成功获取到了JSON结构中的所有信息,接下来,你就可以把天气信息显示在某些设备上了。
完整工程源码,请关注公众号:单片机爱好者,回复关键字:ESP8266,即可获取。